
A few potential riders have asked about using gpx files to navigate. This article explains the basics and one way to do it as a starter for those who don’t know. However, there are many other different devices and apps that can be used for gpx file navigation.
Basic Terminology
Firstly, we need to define a few terms:
- GPS System – The GPS System is a group of satellites. A device can use these satellites to determine its position somewhere on planet earth.
- GPS enabled mobile phone – A mobile phone that includes GPS software. This software allows the phone to know its own position. If your phone has ever asked you to turn “location” on, it is probably GPS enabled. The same goes if you’ve seen “location” in its settings. Importantly, this capability is separate from the internet and phone calls, and independent of mobile phone towers. A mobile phone doesn’t even need an active SIM card to find those GPS satellites and calculate its position. Most people have probably thrown away an old mobile phone they could use as a free GPS navigator and tracker.
- GPX file. GPX is a file protocol for spatial map files. This is similar to mp3 being the protocol for audio files, Jpg being the protocol for image files and Mp4 being the protocol for video files. The GPX files cyclists use contain track, or planned route information – i.e. a line on a map we want to follow.
- GPX Viewer. A GPX file is only part of the story. Just as mp3 or mp4 files need players to make them play music or video, a GPX file needs to be loaded into a GPX Viewer or App. This allows users to see the line or route they plan to follow.
- Navigation. The ability to use a map or other signs to get from one location to another efficiently, without getting lost. To do this you need to know where your desired location is and how to get there (obviously). But it is probably even more important to know where you are on the map right now. Otherwise, the map is useless. Most people have experienced navigation using the GPS System in cars.
- GPS App. Now we start putting it all together. You load a GPS App onto your mobile (there are many different apps available). A good basic GPS App:
- Has a background map (often live from the internet),
- Gets your current location from the GPS in the mobile phone. It plots the location on that map, often as a blue dot.
- Includes a GPX Viewer. You can upload a GPX file with your desired route. It places that line on the map as well.
- Allows you to Navigate. The App shows you where you are. It also indicates if you are on the desired route to your destination. As you move, the blue dot also moves – hopefully along the gpx track to you destination. If you go off route, you can see the dot leave the route line. This allows you to take action to move back onto your desired route.
- Apps that do all this are available for free. This means it is possible to do everything described above for zero cost.
- GPS App with additional features. Some GPS Apps also have additional features, usually these are in paid Apps. Examples of additional features include:
- a voice with turn by turn navigation advice,
- an altitude profile and gradients along your proposed route,
- a warning noise when you get a certain distance away from your desired route,
- ability to load lots of gpx files onto one map so you can see them all at the same time,
- a downloadable internal background map so you don’t have to rely on the internet for your background map, and
- the ability to record your actual ride on the map and export that as a new gpx track file.
- Ride Metrics. Ride metrics are things about your riding you might want to measure that are not navigation. For example speed, cadence, altitude, heart rate, total moving time and distance travelled so far. The reason I am mentioning these is I think bikepackers starting out should keep ride metrics and navigation separate. It is possible to get separate free apps that do a very good job at either navigation, or ride metrics. However, once you try to get one app or device to do it all, it becomes a lot more expensive. There are usually compromises in function and visibility. For example, what you can see on a small screen at any point in time. Therefore, I suggest keeping them separate at least until you know what functionality you really want from each category.
.
Why Self-Navigate?
There are several reasons why you should move to electronic self-navigation.
- It opens up many more ride opportunities. Cycling is becoming digitised, and is more about information than infrastructure. You don’t need to wait for local government to put up signs first. You can find many great places to ride right now. This is especially true for bush, outback, and adventure riding.
- It adds to the sense of achievement when completing a ride, knowing you have navigated the route yourself. This builds more confidence and resilience in planning for bigger rides in the future.
- Signs are very expensive infrastructure, particularly out in the bush where you need lots of signs. If everyone moves to self-navigation less money needs to be spent on this unnecessary infrastructure. Then more money will be available to spend on more valuable infrastructure. These may include safer cycling options for children and families in urban environments.
.
How to do it
This is what I use, but there are other options. I have tried other apps and approaches. I find this setup is very low cost and works well for my needs.
To demonstrate, it is probably best to step through an actual example. This example uses the gpx files from Red Ridge Ride – Wineries Tour.
Step 1: Device and App
- Device: Mobile phone, I use Android, but Apple phones also do this.
- App: GPX Viewer. The free version is very usable – I would pay for this if it was not free. I’ve paid the one-off-fee (<$10) to upgrade to the pro version. It gives me a background map when I am offline. It also provides the ability to record my own breadcrumb track as I ride.
Step 2: Download the GPX Files
The links to GPX files for various options for the winery ride are below. I would download and load all 3 so I can change plans during the day if needed.
- Base loop (marked blue in map above) – 69 km.
- Shortcut loop (marked green at crossover in map above) – 57 km.
- Base loop + All the side trips to wineries (blue + red on map above) – 95 km.
The links go to my Google drive. Android users should be able to just click on the links and then click download. Some iOS users have trouble. This seems to be because they have set their security to not download files from unrecognised third parties.
Step 3: Open the App with GPX files in it
This can be a bit tricky the first time and varies for each mobile phone setup.
Some mobiles will automatically open GPX Viewer showing the GPX file you just downloaded.
For other mobile phones, you will need to open the GPX Viewer app. Then click the open file icon. Next, select the GPX files you want to open. You need to know the folder where your mobile stores downloaded files.
Step 4: Self-Navigation
The screenshot to right shows all three gpx files loaded onto the GPX Viewer app on my mobile phone.
Multiple routes automatically show in different colours. Loading all three routes makes it easy to adjust plans during the ride.
A moving blue dot shows your current location. The blue dot is not shown in the pic to the right. I was not in the map area when I took the screenshot.
The blue dot moves along the routes as you ride, so you know you are staying on course.
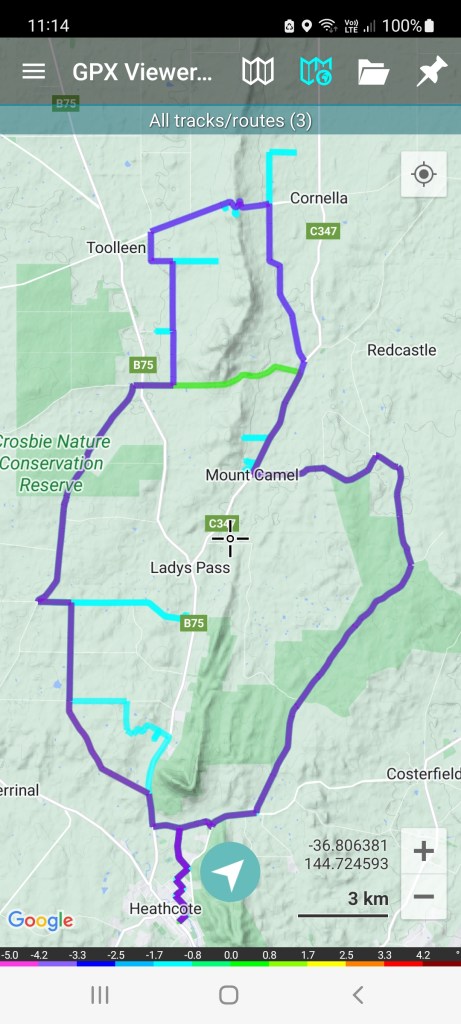
The GPX Viewer app will sound an audio warning alarm. This happens when you go off-course from any of the gpx routes you have loaded.
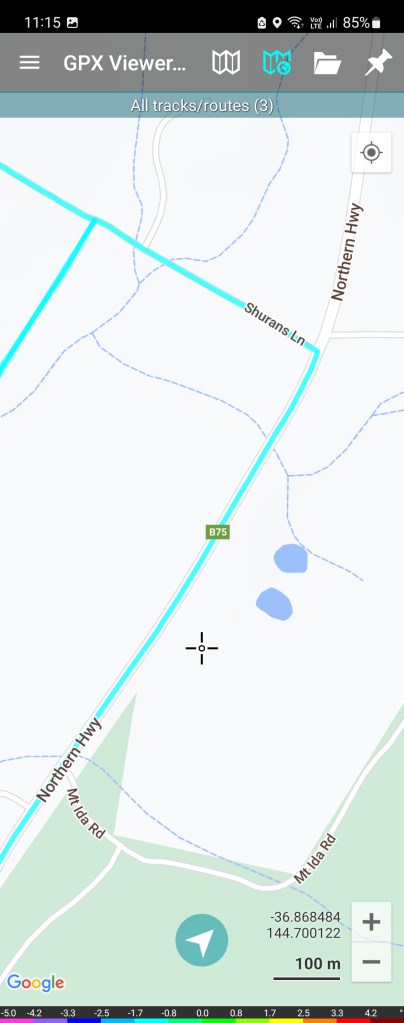
This app also allows you to zoom in if you need to know road names or more exact information.
In the pic to the left, the scale at the bottom now shows 100 metres. You can zoom in closer if necessary.
This is a free app. Everyone has access to a mobile phone that will support apps like this.
This app even works offline. It functions when a mobile phone can’t connect to the mobile or internet networks. You may not get a background map if you haven’t pre-loaded one.
.

Leave a comment